How do I fix my audio settings on Skype?
Skype is an extremely popular communication platform used by over 300 million monthly active users for video calling, messaging, and audio calls (Usage statistics for Skype). With so many users around the globe, audio settings can sometimes cause issues with call quality and clarity. Some common audio problems on Skype include microphone not working, audio cutting in and out, echo or static during calls, and speaker or headset malfunctions. This guide covers step-by-step troubleshooting to help fix any audio issues you may be experiencing with Skype on your desktop or laptop. By adjusting your microphone, speaker, headset and Skype settings, updating your audio drivers, and checking for network problems, you can get your audio working properly again for clear Skype calls.
Check Your Microphone Settings
The first step is to access your microphone settings within Skype to check if your microphone is working properly. To get to the microphone settings in Skype:
- Open the Skype application on your computer.
- Click on your profile picture in the top left corner.
- Select ‘Settings’ from the dropdown menu.
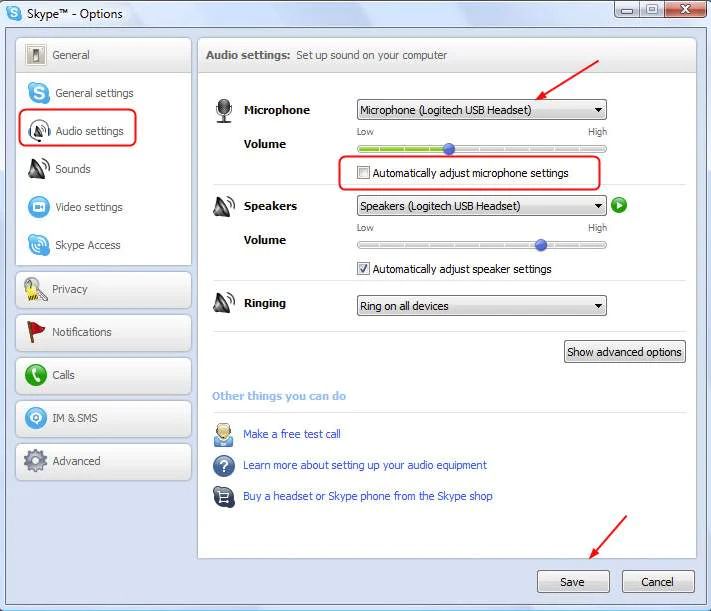
- Click on ‘Audio & Video’ on the left sidebar.
- Under ‘Microphone’ check that Skype is detecting your microphone device. If not, click ‘Select Microphone’ to choose the correct input.
Next, make sure your microphone is not muted in Skype. An easy way to check this is to look for the microphone icon next to your name during a call. If it has a red line through it, your mic is muted and needs to be unmuted by clicking on the icon.
You can also check your microphone volume level in the Skype audio settings. Click on ‘Advanced’ and ensure the bar is moving when you speak into your microphone at a normal volume. Adjust the ‘Microphone Level’ slider as needed so your voice is clearly audible to the other caller.
Checking these basic microphone settings within Skype is often the fastest way to resolve audio issues during calls. Make sure Skype recognizes your microphone device, and that the volume is at an appropriate level with the mic unmuted.
Adjust Speaker/Headset Settings
One of the most common issues with Skype audio is having the wrong speaker or headset selected. Skype allows you to choose which audio output device to use for calls and notifications. Here are some tips for adjusting your speaker/headset settings in Skype:
1. Open the Settings menu in Skype and select Audio & Video. Look for the “Speakers” section.
2. Make sure the correct speaker or headset is selected. The dropdown will show you all available output devices on your computer. Choose the one you want to use for Skype calls.
3. If you have multiple audio devices plugged in, try setting the one you most commonly use for voice calls as the default device in Windows Sound Settings. This will make it automatically selected in Skype.
4. Run a test call and check if audio plays from your chosen speaker/headset. During a call, you can switch devices via the in-call audio settings.
5. If you don’t hear any audio from your speakers/headset, try changing the volume in Windows Sound Settings. Make sure nothing is muted.
6. Headsets sometimes have their own volume controls. Check if your headset volume needs to be adjusted.
Properly configuring your audio output device is crucial for good call quality in Skype. Take time to test your speakers or headset before an important call to avoid issues.
Troubleshoot Microphone Hardware
If your microphone is not detecting any input when you try to speak into it, this indicates a hardware problem. First, check that the microphone itself is not damaged. Inspect the microphone and audio jack for any signs of damage. If using a USB microphone, try plugging it into a different USB port.
For headsets, make sure the headset is properly connected and the connector is fully inserted into the audio jack. Try connecting the headset to another device to see if the microphone works there. If the microphone only fails on one device, it may be a problem with that device’s mic input rather than the headset itself.
Laptops commonly have built-in microphones near the webcam. Make sure nothing is covering the mic hole, blocking sound input. Also try doing a microphone test in the Windows Sound settings to see if any input gets detected. If the built-in mic is not working, connecting an external mic or headset is a workaround.
As a last resort, you may need to replace a damaged microphone or headset if physical damage is preventing it from working properly. Checking the hardware first can identify any defect causing microphone input issues.
Update Audio Drivers
Keeping your audio drivers up-to-date is important for ensuring proper functionality with programs like Skype that rely on your microphone and speakers. Outdated or corrupted audio drivers can prevent Skype from detecting your microphone input and audio output devices.
You can update your audio drivers in Windows 10 and 11 by going to Start > Settings > Sound and selecting Sound Control Panel. In the Recording and Playback tabs, right-click on your microphone and speaker devices and choose “Update Driver.” This will initiate a scan to search for the latest driver software from your hardware manufacturer. Allow Windows to install any available driver updates automatically.
You can also visit your hardware manufacturer’s website to download the latest audio drivers directly. For example, Realtek, Intel, Nvidia, and other brands provide driver update utilities and downloads for their integrated or dedicated sound cards and chips.
After updating your drivers, restart your PC and relaunch Skype to see if the issue is resolved. Keeping sound drivers fully updated helps optimize performance and compatibility with communication apps.
Source: https://www.makeuseof.com/windows-skype-audio-not-working-fix/
Adjust Windows Sound Settings
The Windows Sound control panel allows you to configure the audio devices and sound enhancements used by Skype and other programs. To access it:
1. Open the Start menu and select Settings > System > Sound.
2. Under Output, make sure the correct speakers or headset are set as the Default Device. Test playback audio to confirm.
3. Select the device and click Device Properties. On the Enhancements tab, enable or disable features like Loudness Equalization for improved sound quality.
4. Under Input, set the appropriate microphone as the Default Device. Select the mic and ensure the proper levels are set under Levels.
5. On the Advanced tab, try changing the audio Quality to DVD or Studio Quality for better Skype call quality. Enable exclusive mode access if available.
Adjusting these Windows sound settings optimizes audio playback and recording for Skype. Be sure to select the correct input/output devices used with Skype before adjusting enhancements.
Change Skype Audio Settings
Skype allows you to customize audio settings to optimize sound quality during calls. Two important settings to check are the audio codec and echo cancellation/noise suppression.
Skype supports different audio codecs including SILK, G.729, and MP3. SILK is Skype’s default wideband codec that provides high quality sound. G.729 is optimized for low bandwidth usage. MP3 provides compatibility with more devices but may have lower call quality. You can select your preferred codec in Skype’s audio settings.
Echo cancellation and noise suppression help remove background noise to improve call clarity. Enable these features in Skype’s audio settings menu. Also adjust the slider for noise suppression strength as needed. Too high may cut off speech while too low leaves background noise. Test different settings to find the ideal balance for your environment.[1]
[1] https://support.skype.com/en/faq/FA34863/how-do-i-change-audio-and-video-settings-in-skype
Conduct a Skype Audio Test Call
One of the easiest ways to check your microphone and speakers in Skype is to make a test call to the Skype Echo / Sound Test Service. This is an automated service that will record you speaking and play it back to you. Here’s how to make a test call:
- Open your Contacts list in Skype and search for “Echo / Sound Test Service”.
- Initiate a call with the Echo contact.
- Clearly speak into your microphone after the beep tones. The service will record and playback your voice.
- Listen to the playback to check if your microphone is working properly without distortion or echo.
- Have the Echo service playback music clips to test your speakers.
The benefit of making a test call is you get real-time feedback on the call quality, as experienced by the other user. Listen for any cracking, static or jitteriness in the playback. If the audio quality is poor, you will know there is an issue with your Skype audio settings, microphone or speakers that needs troubleshooting.
Troubleshoot Network Issues
Network issues like low bandwidth, packet loss, and high latency can significantly impact your Skype call quality. Here are some tips for troubleshooting network problems:
Test your network speed using a tool like Speedtest to check for bandwidth issues. Skype recommends at least 100 kbps bandwidth for calls. For high-quality video, increased bandwidth is required.
Switch between wired and wireless connections to see if one performs better. Wired networks tend to be more reliable than WiFi for bandwidth-intensive apps like Skype.
If on WiFi, move closer to your router to improve signal strength. WiFi range issues can negatively impact call quality.
Check router QoS settings. Assigning high priority to Skype’s ports can help ensure your calls get bandwidth priority.
Contact your ISP if you consistently get poor results on speed tests. There could be an issue with your internet plan’s speeds.
Restart your modem/router and computer to troubleshoot any temporary network problems.
Check Skype during different times of day to see if network congestion is an issue. Bandwidth usage often spikes during peak hours.
Contact Skype Customer Support
If you still have issues with your Skype audio settings after trying all the troubleshooting steps, you may need to reach out to Skype’s customer support team for additional assistance.
Skype offers a few different customer service options to help resolve technical issues (Skype Support, n.d.):
- Online Support Form – Fill out a form describing your problem and a support rep will respond via email.
- Live Chat – Chat with a support agent in real-time via Skype’s chat platform.
- Skype Community Forums – Post your issue to get help from Skype staff and other users.
- Twitter Support – Tweet @SkypeSupport to get assistance via Twitter.
When contacting Skype support, be prepared to provide details about your audio problem, including:
- What types of calls are affected (one-on-one, group, video, etc.)
- If the issue occurs on mobile and/or desktop
- The make/model of your microphone, headset, speakers
- Results of any troubleshooting steps already attempted
Skype’s technical support team can help troubleshoot your settings, update configurations on Skype’s end if needed, and identify any potential microphone/hardware issues. They may also gather diagnostics from your system to assist in resolving the audio problems.
Contacting customer support should be your last step after trying all other troubleshooting suggestions without success. Skype aims to provide quality technical support to get your audio working properly again (Skype Customer Reviews, n.d.).
